Raspberry Pi: The discrete security camera solution
In progress
Last year, I was involved in a project to research a system to equip listed buildings in the UK with wireless power to control heating systems (since you can’t drill holes everywhere to run wires and cables). The part I was working on was developing a simple app to control a boiler from a tablet or phone through a Raspberry Pi and this was my first real experience with one.It turns out they’re actually really cool to work with and a great way to get into using Linux – I would advise anyone who is remotely interested in Linux or computing to get one; they’re cheap, they’re very accessible and there is a whole load of documentation on them. They’re also very useful.
Since necessity drove that project, necessity once again drives me to use a Pi again; this time with a camera to observe what is going on when I’m not around! RPis have amazing versatility and can snuggly fit into small places and be tasked to do a variety of information gathering and monitoring tasks. You can google around to see just how useful they are but one thing that we really wanted to do at work was to have “eyes” on our server room, so that we don’t have to keep going in and out just to check what might be happening in there with various status lights (or just to see if any other staff go in and out of the room!).
The plan is to have a motion-activated recording stream, possibly with notifications sent via email, when movement is detected, and to output the video to either a web-stream or to video file. Hopefully this guide should help anyone else get set up in the same way and point out some of the problems you might also have (and how to fix them!). As I go along, I’ll explain the various steps and break them down a bit in case anyone just needs one thing on its own for their own projects.
Anyway; my setup, for this guide, consists of:
- Raspberry Pi 2 B+
- SanDisk Ultra 16GB microSDHC card
- Raspberry Pi Camera Module
- 2100 mA switching supply and a 2m micro-USB lead
- Edimax EQ-7811UN USB wireless adapter
- HC-SR501 PIR sensor (with three female-to-female jumper wires)
Setting up and installing the Pi
Raspberry Pis (RPis) are very easy to set up out of the box. The Raspberry Pi foundation and its community are very active and seem support Raspbian very well, which is a Raspberry-Pi focused distribution of Debian; so I would recommend anyone new to using an RPi start by using Raspbian.
To get started, you will have to copy the image (of which there are several to choose from – I am using Raspbian here) to a micro SD card with something like Win32DiskImager. A full guide is here and, once done, you simply slot it in to the Raspberry Pi, connect up the power and network and get started. The links are quite straightforward; you’re essentially just copying a bootable binary distribution to an SD card.
Now, you can set the RPi up with a keyboard and HDMI output to a screen, but I really dislike how cluttered this ends up looking and with cables all coming out at right angles to each other, I prefer to just use SSH where I can. And, with Raspbian, you seem to be able to SSH into the RPi straight out of the box with no additional configuration, although you need to know the IP address to do this and Raspbian has its wired port’s configuration set to DHCP by default.
Since I installed this in my office, I had no idea what address it was given, so this is where nmap comes in handy. Nmap (or, the Zenmap gui) can be used to find hosts on your network by performing port scans. You can use quite extensive scans but be very careful with using this – while it probably won’t break anything, it can be intrusive and get unwanted attention from anyone that monitors your network (I’m thinking corporate/office networks here). The only purpose you’d be using this for, for this guide, is to scan for open SSH ports (port 22) on your local subnet. The command line options for this looks something like the following:
nmap -p 22 -sV 192.168.1.0/24
This tells nmap to initiate a scan on the 192.168.1.x network for hosts that have port 22 active. You could also add –open to get rid of hosts with port 22 set to “closed” or “filtered” but more importantly, adding -sV tries to determine the device’s version – without this, you’d be guessing as to what a system is, since it can tell you exactly what the host is running (and we are looking for a host running Debian, see the picture below for an example output)
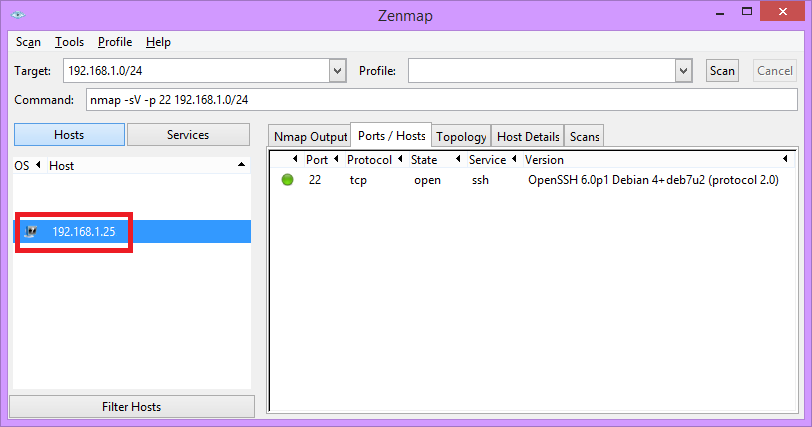
This simple scan, consequently, shouldn’t take long and what you should see returned in your list is a system running Debian. This entirely depends on where you actually do this scan; in an environment that isn’t under your own control (for example, in a workplace) then make sure you know what the network’s IP range and subnet mask are, but once you find your RPi, you don’t need to use nmap anymore. Once you have the IP, you can just open an SSH terminal connection to your RPi using something like PuTTY and use the username/password of pi and raspberry (which is the default).
Wifi connectivity
The first thing I wanted to do as soon as I connected to the RPi was to set up the wireless dongle I bought. I really just one one, single, cable connecting my RPi to anything at all. No keyboard, no mouse, no network cable. Luckily, Realtek’s 8192cu driver works out of the box with the Edimax USB adapter (which is incredibly tiny and low profile in design) and very little configuration is needed.
Using ifconfig will tell you the name of your network interface but it is almost certainly going to be “wlan0”. The configuration for all network interfaces is in /etc/network/interfaces/, where the following lines can be added to configure the Wifi interface with a WPA key and a DHCP-derived address:
allow-hotplug wlan0
auto wlan0

iface wlan0 inet auto

wpa-ssid "NetworkSSID"
wpa-psk “YourPasskey"
Or, for a static address, use the following instead:
allow-hotplug wlan0
auto wlan0

iface wlan0 inet static
#The RPis address, subnet mask, router/gateway address and DNS server address
address 10.3.17.15
netmask 255.255.255.0
gateway 10.3.17.250
dns-nameservers 10.3.17.250

wpa-ssid "NetworkSSID"
wpa-psk “YourPasskey"
After saving and exiting (ctrl+o and ctrl+x if you edited it using sudo nano), you can use the command ifup wlan0 to bring the interface up. Use either sudo service networking restart or sudo reboot to make the new settings take effect. (note, you’ll likely have to do everything prefixed with sudo here so if something doesn’t work because of a permission error, prefix it with this)
You might see these lines pop up on boot:
ioctl[SIOCSIWAP]: Operation not permitted
ioctl[SIOCSIWENCODEEXT]: Invalid argument
ioctl[SIOCSIWENCODEEXT]: Invalid argument
I have absolutely no idea what these do or what the cause is, but they don’t seem to do anything at all. I have a feeling it relates to ifplugd. Similarly, I haven’t seen any need for the following yet, which seems to exist in the interfaces config file:
wpa-conf /etc/wpa_supplicant/wpa_supplicant.conf
Things seemed to work just fine without it (and I like to only include things that I know the use of) but you might want to keep using it as it should already be in the interfaces file. Note for later: xplain more on wpa_supplicant
Wifi Issues
So this should all work fine, but there have been one or two odd issues. Now, Wifi seems to – not infrequently – be a pain with any system. I had many issues when setting an RPi up as an access point last year (which I may cover in another post as RPis make nice small access points that can do a variety of things) but I found that it almost always boils down to either power issues or driver issues.
- The main problem I faced is what seemed to be bad lag or a timeout issue. Sometimes, I couldn’t connect at all by SSH (connection would timeout) and other times, if left for a while, the SSH session window would either take a good 10 – 15 seconds to respond to an input from my keyboard or just return an error and disconnect.
- Some people suggest playing around with reinstalling different drivers, which shouldn’t really be necessary.
- Other suggestions were to periodically send a ping as a keepalive method through a cron job every so often, to stop the interface shutting itself down (if that is what it was actually doing).
- Another suggestion I saw was that there is a power-saving issue. The solution would be to include the line wireless-power off in the interfaces file, although it was also suggested that, when running the command iwconfig, “Power Management:on” should be visible (and, in my case, it said “Power Management:off”).
In the end, however, this link proved to be useful, by suggesting to add a new file called /etc/modprobe.d/8192cu.conf that simply contains the following line:
options 8192cu rtw_power_mgnt=0 rtw_enusbss=0
After adding this, the issue seems to have been fixed and I can leave the RPi on with no issue at all. So it looks like there is some sort of power-saving mode that the Edimax dongle enters into if there is no activity for a while and that it doesn’t always wake up when it should do.
- If the wireless network you’re connected to goes down, your network connectivity drops. When it drops, it won’t come back up. This is because ifplugd will shut down your wireless interface automatically – and it won’t come back up again unless you restart your RPi (or unplug and re-insert your dongle).
This is evidenced through the log in /var/log/daemon.log (you can use cat /var/log/daemon.log to show it in the console window through SSH or you can download the file using something like WinSCP) – although this might be daemon.log.1 or something, depending on how many restarts you have had to do. Fix to be edited in later and add grep filtering
Apr  5 02:16:13 raspberryPi ifplugd(wlan0)[1565]: Link beat lost.
Apr  5 02:16:16 raspberryPi wpa_supplicant[1573]: wlan0: CTRL-EVENT-DISCONNECTED bssid=<macaddr> reason=0
Apr  5 02:16:23 raspberryPi ifplugd(wlan0)[1565]: Executing '/etc/ifplugd/ifplugd.action wlan0 down'.
Apr  5 02:16:23 raspberryPi wpa_supplicant[1573]: wlan0: CTRL-EVENT-TERMINATING - signal 15 received
Apr  5 02:16:23 raspberryPi ifplugd(wlan0)[1565]: Program executed successfully.
Secure SSH
Ok, so one more thing to add here, backtracking a bit to earlier where I mentioned about SSH access, is that if you are using this system over a public address (IE through the internet), then you should consider how openly you enable access. If someone was to do a random port scan of your IP, find port 22 (SSH) open and try a default username and password for your system, they would get full access very quickly. This is a very bad idea to let happen.
So what I did was to use port forwarding so that a random port externally (for my public IP) will translate to the internal port 22 of the RPi (on the local network). You would set this up on your router that controls internet access to your work network or, if you are using this at home, on your home router (most, such as BT’s Homehub devices, have a web interface which allows you to control port forwarding settings).
That, to begin with, will get rid of the bulk of people scanning port 22. But people could still try and connect through SSH to your randomly-chosen port. The next thing you can then do is to restrict how many password attempts someone can use – but I opted for an even better method which is to use an RSA public/private key instead. This way, I not only don’t have to keep entering a password, but it should be a lot more secure than using a password.
For this, you can use Putty’s key generator, PuTTYgen, and upload the public key to your RPi to a specific (hidden) directory. You can do this through opening a new text file on your RPi called /home/pi/.ssh/authorized_keys and copy-pasting the contents of your public key into it, which should look something like this:
ssh-rsa aVeRyLoNgKey= myrsakey-2015
You then must make sure that the private key is added to any of the systems you want to access your RPi from by using Pageant (if you are using PuTTY, it will install this too in its default options) to add the private key in from wherever you’ve stored it. Now, for one extra layer of security, if you are using a computer where it is possible that somebody else may get access to your private key you can also add a password to the .ppk file so that you cannot even load it without a password. This could seem a bit overkill, I believe you can’t be too cautious when you have such a potentially open crack to a home or corporate network like this.
Just make sure that you remember also to turn off the ability to use a password to login (and after you do this, you won’t be able to connect again without the key, so do make sure that it works before you continue!) through ssh in /etc/ssh/sshd_config by setting
#PasswordAuthentication yes
to
PasswordAuthentication no
You should now be able to securely access the RPi from anywhere, provided you have forwarded the right ports on your router, using your public IP address. I would very much suggest not to give your private key out to anyone, it kind of defeats the point of this.
Camera
Now for one of the main parts – using the camera. On the RPi, once you’ve plugged the camera in, you can enable the CSI port by launching the initial configuration utility. You’ll likely have to do this anyway, if you are configuring the RPi through a keyboard and monitor, but through SSH you can just run sudo raspi-config and you will see an interface with some options. Note that you can use this to change your password, expand the file system to use all the SD card space available and change some other settings, but the main thing to do is to select the option to enable the camera. More information on Raspi-config can be found here
Also; watch out how you connect it – I had to figure out that you must lift up bits of the plastic on the sides of the slot and then “clip” the camera cable in, metal-side towards the power connector. This wasn’t actually particularly obvious when it was shipped!
You can test the camera with “raspistill -o image.jpg”. This will output a file called image.jpg to whichever folder you are in and you can use something like WinSCP to copy this across and view it on a PC to verify it works.
One thing you will notice is that it is upside down possibly. You can fix that with a vertical flip, using “raspistill -o image.jpg –vf” – but of course, we just wanted to rotate and not flip the image. So to correct the mirrored image we actually should be using two switches, as so: raspistill -o image.jpg –hf -vf”
You will also notice that a red LED goes off when it takes a picture. This is good for testing perhaps, but can get counter-productive if you wanted the camera to be less intrusive. Once you are sure it is all working fine, you can later stop this behaviour from happening by adding this line to boot/config.txt:
disable_camera_led=1
And now the camera will no longer emit a red LED when it takes a photo or a video!
https://miguelmota.com/blog/raspberry-pi-camera-board-video-streaming/
Web server
apt-get install apache2
Extras and cleanup
lsmod
lsusb
php get ip address of visitorordless.md
http://www.raspberrypi.org/documentation/remote-access/ssh/passwordless.md
nano /etc/hosts to change hostname there too
daemon, syslog, dmesg nand the .gz files
todo
- Wifi start periodically if its down
- Detect usb removal and insertion
- Email confoiguration and statuses
http://www.raspberrypi.org/camera-board-available-for-sale/
Install netcat
Install vlc
Activate (modprobe) bcm2835-v4l2
This and raspivid use mmal
Click to access RaspiCam-Documentation.pdf
http://www.raspberrypi-spy.co.uk/2013/05/capturing-hd-video-with-the-pi-camera-module/
http://www.codeproject.com/Articles/665518/Raspberry-Pi-as-low-cost-HD-surveillance-camera
http://stackoverflow.com/questions/7331990/live-monitoring-charts-on-a-web-page
http://www.script-tutorials.com/how-to-easily-make-ajax-style-php-chat-application/
http://stackoverflow.com/questions/1327071/how-to-create-rss-reader-with-php
http://en.wikipedia.org/wiki/Ajax_%28programming%29
http://en.wikipedia.org/wiki/Atom_(standard)
Wake on Lan
So the RPi can be used to do something really cool, which is sending a wake on lan packet across the network
- Install ethrool
https://wiki.archlinux.org/index.php/Wake-on-LAN
root@raspberrySpi:/home/pi# ethtool eth0
Settings for eth0:
Supported ports: [ TP MII ]
Supported link modes: 10baseT/Half 10baseT/Full
100baseT/Half 100baseT/Full
Supported pause frame use: No
Supports auto-negotiation: Yes
Advertised link modes: 10baseT/Half 10baseT/Full
100baseT/Half 100baseT/Full
Advertised pause frame use: Symmetric Receive-only
Advertised auto-negotiation: Yes
Speed: 10Mb/s
Duplex: Half
Port: MII
PHYAD: 1
Transceiver: internal
Auto-negotiation: on
Supports Wake-on: pumbag
Wake-on: d
Current message level: 0x00000007 (7)
drv probe link
Link detected: no
Grep useful again!
root@raspberrySpi:/home/pi# ethtool eth0 | grep Wake
Supports Wake-on: pumbag
Wake-on: d
sudo ethtool -s eth0 wol g
install wakeonlan
wakeonlan <mac>
Motion Sensor
The Passive Infra-Red (PIR) sensor was really cheap to source – about £2-£3 from Amazon – and is very easy to use. The one I bought, an HC-SR501, had three pins already attached to the board, so there was no soldering needed.
add the python script to startup
rc.local
python3 /home/pi/pirtest.py & <-important to add the ampersand to fork the process
root@raspberrySpi:/home/pi# python3 pirtest.py &
[1] 13124
root@raspberrySpi:/home/pi# ps aux | grep pir
root 13124 3.5 0.7 9912 7052 pts/0 S 21:22 0:00 python3 pirtest.py
root 13126 0.0 0.2 3552 1840 pts/0 S+ 21:23 0:00 grep pir
root@raspberrySpi:/home/pi# kill 13124
root@raspberrySpi:/home/pi# ps aux | grep pir
root 13128 0.0 0.2 3552 1772 pts/0 S+ 21:23 0:00 grep pir
[1]+ Terminated python3 pirtest.py
Add this to the py script:
Import subprocess
And so “subprocess.call(“testWOL.sh”), which juust contains the WoL command
Remember to add in stuff in puython with spaces for onsistency
Traceback (most recent call last):
File “pirtest.py”, line 20, in <module>
subprocess.call(“testWOL.sh”)
File “/usr/lib/python3.2/subprocess.py”, line 471, in call
return Popen(*popenargs, **kwargs).wait()
File “/usr/lib/python3.2/subprocess.py”, line 745, in __init__
restore_signals, start_new_session)
File “/usr/lib/python3.2/subprocess.py”, line 1371, in _execute_child
raise child_exception_type(errno_num, err_msg)
OSError: [Errno 2] No such file or directory: ‘testWOL.sh’
- Remember to add ./ because otherwise it says file not found
Traceback (most recent call last):
File “pirtest.py”, line 20, in <module>
subprocess.call(“./testWOL.sh”)
File “/usr/lib/python3.2/subprocess.py”, line 471, in call
return Popen(*popenargs, **kwargs).wait()
File “/usr/lib/python3.2/subprocess.py”, line 745, in __init__
restore_signals, start_new_session)
File “/usr/lib/python3.2/subprocess.py”, line 1371, in _execute_child
raise child_exception_type(errno_num, err_msg)
OSError: [Errno 13] Permission denied
- Chmod +x on the shell file or you get this
Traceback (most recent call last):
File “pirtest.py”, line 20, in <module>
subprocess.call(“./testWOL.sh”)
File “/usr/lib/python3.2/subprocess.py”, line 471, in call
return Popen(*popenargs, **kwargs).wait()
File “/usr/lib/python3.2/subprocess.py”, line 745, in __init__
restore_signals, start_new_session)
File “/usr/lib/python3.2/subprocess.py”, line 1371, in _execute_child
raise child_exception_type(errno_num, err_msg)
OSError: [Errno 8] Exec format error
- Make sure you add ‘./testWOL.sh’, shell=True to your script so that it executes it properly
Or
- Add the shebang for !#/bin/sh
Finally, make sure it’s the whole path of ./home/pi/testWOL.sh otherwise it doesn’t know where it is
raspivid -o – -w 640 -h 480 -t 0 -hf -vf | cvlc -vvv stream:///dev/stdin –sout ‘#standard{access=http,mux=ts,dst=:12341}’ :demux=h264
‹ Multiple-user student webserver – Part 2 A summary of Unix permissions ›