FOG Update – Part 4
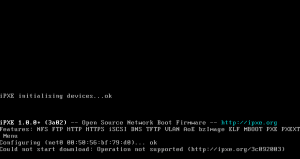
Last week was spent trying to get our ESX cluster back up and working, so now its back onto FOG. Towards the end of the week, I did manage to spend some time on this again. I changed our switch configurations for the three rooms we manage the network of ourselves to point from pxelinux.0 to undionly.kpxe, which now uses iPXE (a bit better and can use other protocols rather than tftp, such as http). Whether this provides any speed differences remains to be seen.
Host registration
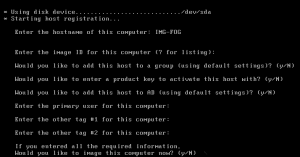
For our own rooms, this small change actually worked and the following screen became visible for a new, unregistered host.
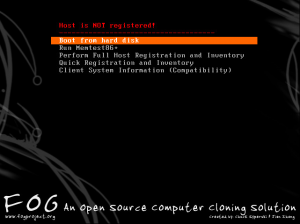 The timeout option for the menu can be changed from the FOG management webpage – for us it is 3 seconds but, after registration has been performed, I will likely reduce it to 0. I am pretty sure that, also, the timeout can be altered to depend on the host’s registration status.
I spent some time working with the rest of the team here walking through the procedure for registering new host machines (since I decided to not bother with exporting and importing a saved list from the previous FOG installation) and, with only five of us left in the team, it was important that we all know how do use FOG in case one of us isn’t here. The registration of ~500 PCs will be a monumental task, but with some tips and tricks, it shouldn’t take too long. When registering a host, all we really need to do is to give it a name – the rest can be edited (including the name, to be fair) in the FOG management menu. A quick way to do this is to just enter the name, hold down the enter key and move onto the next host. Because I haven’t defined any groups right now for the hosts to go into, I can manually add them later – however, it may be a good idea to modify the registration options to not only strip out a load of the useless options but to also extract the group to add the PC into from the host names (as each PC is numbered according to the room it is in).
One thing to add here is that if your organisation, like ours, uses asset tags on their systems, this may have also been recorded by the OEM onto the motherboard. If this is the case, the asset tag (which, for example, DELL would provide for their systems) will be uploaded with the rest of the hardware inventory and can be viewed in the FOG webpage management under each host’s hardware information. When it comes to auditing your hardware, this can be very handy (as it was when we once had to record the MAC addresses for every new PC we had ordered, once – presumably someone had forgotten to do this at an earlier stage before their arrival with us!)
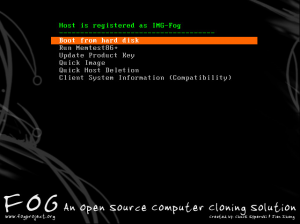
And here we have a fully registered host! If you get the name wrong (as will inevitably happen in the process of manually adding so many hosts), you can actually delete the host using “quick removal” here, which then takes you back to this menu again.
Bootfiles – Pxelinux, Syslinux and Undionly
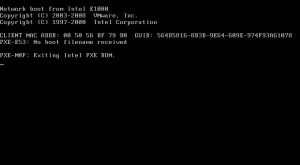
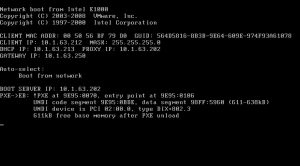
Now to try out the other labs! Upon boot, this happens:
As suspected, this didn’t work on the rest of the rooms we manage, unfortunately. After hanging for a while on PXE booting any of the computers in the labs, the machines time-out saying “PXE E-53: No boot filename received.” This can be from a few causes, but generally it is because the PXE server didn’t respond or that there is no boot file specified even if the server is able to be contacted.
Or, now that we have changed to undionly.kpxe, perhaps the bootfile specified in DHCP option 67 is incorrect. FOG now uses undionly.kpxe as its bootfile. I was a bit confused by what this was, so I’ve been looking around a bit and this article answers it through part of its explanation of PXELinux. It seems that Etherboot’s undionly.kpxe and Syslinux’s pxelinux.0 are combined in the article’s scenario, as they both serve different purposes, but FOG has replaced the latter with the former rather than using both?
I decided to actually check the FOG site out. It explains it quite well and, through a link to an Etherboot blog, it seems that pxelinux.0 IS still used, but that it has been moved to a different stage of the loading chain. Its generated from .kkpxe files, and the undionly.kpxe file is used as a kind of generic PXE loader. The key thing to note is that (and this post by Tom Elliott* back in February details some of the motivations too) iPXE can use different methods of delivery, rather than just tftp – and apparently this can make things faster if done through http (as well as being able to use some cool php magic and things too). *Tom now appears to be one of the main FOG people as, after the change from 0.32, he is listed on the FOG credits as the third creator.
My assumption initially was that, because we can only manage the DHCP pools for three rooms, the rest of the labs’ DHCP pools were unmodifiable by us and, therefore, need to be changed by ICT services.
However, the only thing that had to be changed, ever, on the rest of the University network was that, on the core switches, for each VLAN that we wanted FOG to work on, we needed the ip-helper address to be set. But this hadn’t changed at all – so I couldn’t work out what the issue would be…
proxyDHCP
Then I remembered something – we had to actually configure FOG as a proxyDHCP server. It isn’t that way by default. For this to work, we can use dnsmasq – which is a simple install and adding of a configuration file called ltsp.conf into the /etc/dnsmasq.d directory. Here, certain options are configured to actually enable the proxyDHCP server. The example configuration is commented, so I won’t detail it here. However, a few things to note:
- Each IP address listed represents the network for which the proxyDHCP server will respond to requests from – without listing them, the FOG server won’t respond to any requests from those subnets.
- You can subnet it however you like – so we could do 10.0.0.1 255,255,255.0 and get the whole University – but only the subnets that the University network had configured the IP helper address on would be able to get the FOG booting on anyway, so I decided we should probably list each subnet (and be able to disable each subnet) as we wanted FOG booting to be used on.
- After you add a new subnet for FOG to serve, after saving and exiting the configuration, you should do a” service restart dns-masq”
So in order for this to all work in an environment where you have no access to the DHCP configurations, the following had to be configured:
- iphelper address of the proxyDHCP/fog server had to be included on the core switch, where vlans are specified
- ltsp.conf had to be configured on the fog server running dnsmasq
However, this didn’t help at all.
This turned out to be because, of course, pxelinux.0 is no longer used and the FOG wiki instructs you to change a couple of lines to point to undionly.kpxe
This line:
dhcp-boot=pxelinux.0
is now,
dhcp-boot=undionly.kpxe,,x.x.x.x
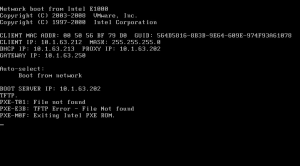
Where x.x.x.x points to the FOG IP. Note, that the IP is necessary as, otherwise, you get this error:
and the line:
pxe-service=X86PC, "Boot from network", pxelinux
is now
pxe-service=X86PC, "Boot from network", undionly
I saved, restarted and now, finally, it works!
But why did it work on our rooms?
As I remember from before, our labs that we manage (three rooms) are served by a stack of Cisco switches where we could add next-server and bootfile. But the rest of the University uses Windows DHCP servers and they never configured options 66 and 67 for us, ever. So why were our rooms able to PXE-boot, by configuring the options 66 and 67? It seems that by having our single DHCP pool include all the details for the FOG server, this will allow it to explicitly point to the FOG server and explicitly include the file name to get. Because the tftp boot folder has been setup already in FOG, the request for the file will be directed to the folder. However, this wouldn’t normally happen across the rest of the University network as the DHCP servers don’t point to our tftp boot server at all. Even when the ip helper address is used it still didn’t work – because the proxyDHCP service wasn’t running (and therefore it wouldn’t respond to any DHCP requests). This is why dnsmasq was used – to start a DHCP service on the FOG system, but without actually giving out any IP addresses.
So if this worked originally for all of the subnets that we configured in ltsp.conf, why couldn’t we just configure it for our own labs? The IP ranges were there, yet they weren’t serving the labs where we maintain all of the configuration for. I will update this post later after looking for a possible original misconfiguration.
Next time: I will try and upload and download a FOG image, with attention to ease of use, speed and how it compares to my experiences with 0.32.
‹ ESX Clusterbomed – Part 2 FOG Update – Part 5 ›
