FOG – Installing and Troubleshooting FOG 1.2.0 on Ubuntu 14.04
Its been a while since I’ve talked about FOG on here. The last 4 or 5 months have been busy and filled up with term-time activities as well as fixing many issues we have had. So FOG is still very much in use where I work, but there have been some changes to how we use it and how it operates. Another thing that has been done is to increase our storage capacity, which might come into a separate post, but the long and short is that our entire infrastructure has been reinstalled in some form or other, including FOG.
The following steps should help anyone who has already installed Ubuntu 14.04 on their system to set up the free computer cloning and computer management package called FOG. You can find more detailed information, including what you can actually do with FOG, elsewhere – for example on the FOG Wiki – so this is just a guide to get it up and running and to look at some of the problems that may be faced in doing so. I recommend using this post instead of my previous posts to get started since its more up to date and some of the original issues just don’t apply anymore.
New Installation
I used to suggest using another guide to install FOG but I may as well use my own. Note that this assume you are using Ubuntu, you are using a separate DHCP server (or none at all) and that you want to use a single network interface:
- Download FOG 1.2.0 using wget
- cd /tmp
- wget http://cznic.dl.sourceforge.net/project/freeghost/FOG/fog_1.2.0/fog_1.2.0.tar.gz
- Unzip the archive
- tar -xvzf fog_1.2.0.tar.gz
- Navigate to the newly unzipped directory and run the fog installation script
- cd fog_1.2.0
- cd bin
- sudo ./installfog.sh
- Follow the steps in the FOG installer wizard:
- Select a Debian-based installation (2)
- This will be a regular FOG server so select normal (N)
- Leave all IP, gateway and DNS settings as default (Enter)
- Use the default NIC (N)
- Don’t use DHCP with FOG (N)
- Select (so make a note of it)
- You are then told to navigate to your FOG page which is at http://<fog address>/fog/management before you finish installation.
- You have to update your database the first time you install FOG. Select “Install/Upgrade Now”
- This is all you need to do on the web side for now. You can go back to your installation and continue, which will finish the installation!
Additional Configuration
FOG won’t start working properly just yet. There are a few settings that need to be changed and some additional setup to make things work as you would expect them to.
Default Apache page
If you navigate with your browser to your FOG server to administer it, you will likely get the default page for your Apache webserver. What you can do is remove this default html page, set the root directory to be in a different location and then redirect visitors to the FOG management page inside the /fog/ directory. So if you want your FOG server to automatically point to the management page, you can do the following:
- Edit the /etc/apache2/sites-enabled/000-default.conf and change the following line:
- DocumentRoot /var/www/html
to - DocumentRoot /var/www
- DocumentRoot /var/www/html
- Remove the default index page
- rm var/www/index.html
- Replace the contents of var/www/index.php with
<html>
<head>
<meta http-equiv="Refresh" content="0; URL=fog/index.php">
</head>
</html>
After you’ve finished, issue a sudo service apache2 restart command and you should now be able to just navigate to the address of your FOG server.
FOG System User and passwords
By default, FOG uses a default username and password of fog and password in order to get into the FOG web UI.
You will likely want to change this password under User Management in the FOG web UI settings, but more crucial is that you have a corresponding system account. You can either change the account FOG uses for everything, or just create a system account (with the same details for the accounts as specified in /var/www/fog/lib/fog/Config.class.php.
- Create a user on the system called FOG with adduser
- adduser fog
- Give it the same password that you are using in the FOG web UI. The other settings don’t matter, they can be blank.
Without this user, you’ll get a variety of errors on the system, I found. Previously, I had used “fog” as the default username for the system, but I like to try and keep these things separate so that I can understand better what is going on.
Edit /var/www/fog/lib/fog/Config.class.php and ensure that the MYSQL_PASSWORD setting has a value in it. It should have – but it may not – the password you created when setting up MySQL with FOG. The root username should also be set to root too, so that it looks something like this:
-
define('DATABASE_TYPE',         'mysql');
define('DATABASE_HOST',         'localhost');
define('DATABASE_NAME',         'fog');
define('DATABASE_USERNAME',     'root');
define('DATABASE_PASSWORD',     'sqlPasswordYouSet');
Image storage
You may have noticed that the original drive size of 40GB was very small. It is – but that’s because I don’t actually want to store the images on the same disk as the rest of FOG. This is so that we can move the images around and back them up much easier than the FOG server and not bloat the rest of the FOG system with these files. Plus, we can offload this to a separate storage device entirely, even located elsewhere.
FOG maps everything to using the root /images folder by default. Instead of using an actual folder for /images, its possible to mount a separate drive as /images – so everything will still point to the same place, but the storage location is different.
- Note if you’re using a VM: make a new disk, something large like 1TB, and also make it Independent. This way, changes are persistent and the disk is much easier to move around to other systems. Restart the VM.
Making a new disk
Assuming that you are using sudo and that the disk is registered on the system as /dev/sdb:
- Make sure that the new drive is actually listed as /dev/sdb/
- fdisk -l
- Wipe the MBR
- dd if=/dev/zero of=/dev/sdb count=20 bs=512
- Partition the disk with fdisk
- fdisk /dev/sdb/
- Select n then p to make a new partition
- Hit enter three times to accept the defaults (default partition of 1 and the first and last sectors)
- Select t to change the system ID to be Linux (83)
- Select a and 1 to make the partition bootable
- Select w to write the table to disk and exit
- Make the system ext3
- mkfs.ext3 /dev/sdb1
Mounting a disk to /images
- If you want to keep the contents of an existing /images directory, you can move the folder to somewhere else temporarily:
- mv /images /images2
- Make the images directory again, if it doesn’t exist:
- mkdir /images
- Mount /dev/sdb to here
- mount -t ext3 /dev/sdb1 /images
- Check the output of mount to see if the disk is mounted as expected.
- If you moved the contents off originally, you can copy it back again and delete the temporary directory:
- cp -av /images2/* /images/
- rm -r /images2/
- Mount the new disk at system startup with adding the following line to /etc/fstab
- /dev/sdb1 /images ext3 defaults 0 0
Using the disk with FOG
You need to add a file to the directory, called .mntcheck, manually. This file is used by FOG and must be there:
- touch /images/.mntcheck
Finally, I set the permissions for the folder so that the user fog owns it and only the specified user and group can access it.
- chown -R fog /images
- chmod 774 /images
Serving FOG to different subnets
I talked about this previously under “proxyDHCP”, and I’m just going to briefly mention what is written here, but essentially you need to configure FOG to respond to requests from other subnets. Refer to both of those links and it should be fine.
Troubleshooting
The following are common issues I have noticed with other people or encountered myself, mostly specifically with Ubuntu 14.04 and FOG 1.2.0. Please feel free to comment on or correct/elaborate on any of these but I’ll try and cover them as briefly and as well as I can!
Undionly.0 is missing
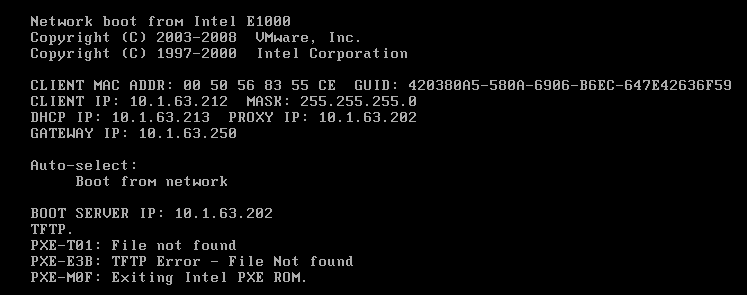
This will almost certainly happen when you first start trying to boot from FOG. In an earlier post, I talked about moving from pxelinux to undionly – but one thing that wasn’t apparent at the time was that you may have a missing file.
In /etc/dnsmasq.d/ltsp.conf, you can specify the bootfile. I checked this and the file specified, undionly.kpxe, is definitely in the /tftboot/ directory, which is where tftp requests can get their files from.
To see if this is an issue with TFTP or something else, you can install the TFTP client on a Windows machine (under “Add/Remove Programs” and then “Turn Windows Features On or Off”) and launch a command line as an Administrator (you won’t be able to do this otherwise, you’ll get an error to do with being unable to connect to the server). If there’s any issue with connectivity to the server or TFTP, you’ll see it here. Use the command “tftp <fog server IP> get undionly.kpxe” to manually download the file and you should see the following if its successful:
C:\Windows\system32>tftp 10.1.100.30 get undionly.kpxe
Transfer successful: 103224 bytes in 1 second(s), 103224 bytes/s
You can also use tcpdump on the FOG server to see traffic for a given host using tcpdump -i eth0 | grep 192.168.31.100 . This will tell you the kind of traffic that is going on between hosts. Note: if you’re using SSH, you want to exclude your own machine by using grep -v <ip of your own machine> otherwise you’ll be generating the same traffic that you’re recording!
So if everything works ok, what is wrong?
It seems to be the case that iPXE requires bootfiles to be appended with .0 . I think this is an issue with iPXE rather than FOG – but previously, undionly.0 seemed to exist (and now it doesn.t). So there are two options, both of which work:
- Copy undionly.kpxe to undionly.0
- cp undionly.kpxe undionly.0
- Symbolic link undionly.0 to undionly.kpxe (you might need -r or you might not)
- sudo ln -s -r undionly.kpxe undionly.0
For more information, see this post I made on the FOG forums which should explain a bit more or some of the responses to a similar issue.
Changing the IP of your FOG server
If you change your server’s IP, you’ll need to edit the settings throughout FOG in order to do this correctly. You’ll need to update every instance of the FOG server’s IP and not just in the interfaces file. You can use grep to find instances of the old IP address and change those by editing the respective file; this search term, for example, will find all references within the subfolders of FOG: grep -r 10.1.1.200 /var/www/fog/lib . You can also use this (maybe out of date) guide on the FOG wiki, but ultimately I think you have to check the following places:
- /var/www/fog/lib/fog/Config.class.php
- /tftpboot/default.ipxe
- /etc/hosts
- /etc/dnsmasq.d/ltsp.conf
- /etc/network/interfaces
- /tftpboot/pxelinux.cfg/default
And make sure that you either restart the whole system or the following services:
- apache2
- networking
- dnsmasq
I personally would suggest to remake the server again but if this isn’t really an option, the above should fix things for you.
DNSMASQ/LTSP breaks DNS lookups
A frequently occurring problem after installing dnsmasq is that despite the interface file configured to point to a specific nameserver, the host is unable to look up any hostnames. This means no package upgrades, namely.
f you look at /etc/resolv.conf (which is actually /run/resolvconf/resolv.conf), it seems that the nameserver is 127.0.0.1. Inside /run/resolvconf/interface/ are all of the interfaces that could be used and inside /eth0.inet, the right settings are configured. However, there is a file called lo.dnsmasq, too – which has the offending address inside it.
What seems to happen is that the interface order has changed at some point so that a load of these loopback interfaces take priority over any physical adapters. Resolvconf gets its settings from numerous sources, which are ordered in precedence here in /etc/resolvconf/interface-order. The solution is not to just remove the lo.dnsmasq, but to change the order in the interface-order file to make eth* the priority.
In short; we want the eth0 (or whatever it is on the system) adapter to be used as the adapter for performing DNS lookups instead:
- Edit /etc/resolvconf/interface-order
- Edit the first entry to look something like the following:
# interface-order(5)
eth*
lo.inet*
lo.dnsmasq
- Restart the dnsmasq service.
Schema needs updating..
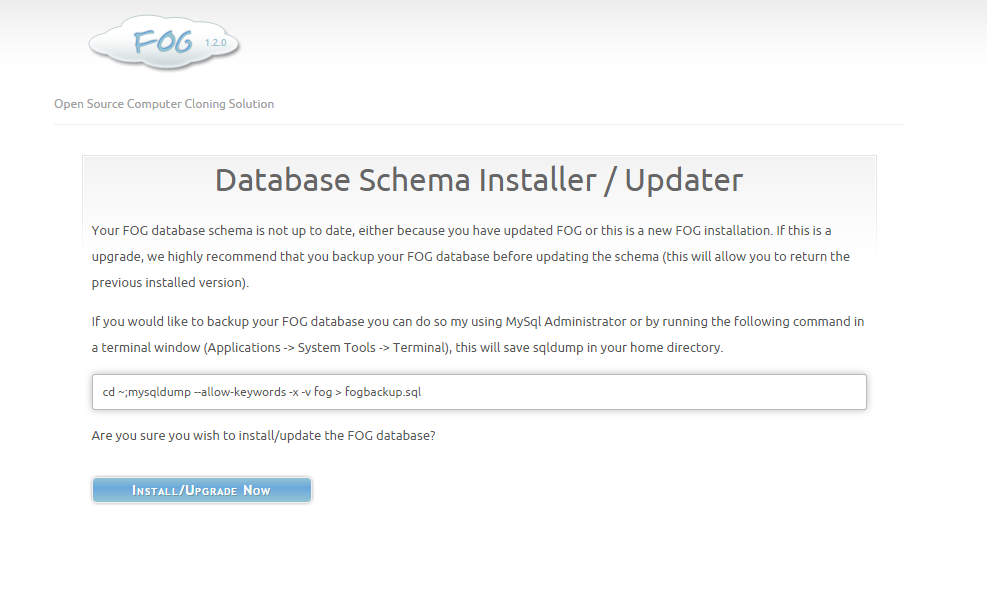
Another common error people seem to get – with apparently no commonly discernible cause – is the following screen with “Your FOG database schema is not up to date..”. when opening the FOG web UI. For me, it most often occurred after a system reboot after initial installation – and it wouldn’t always happen straight away, sometimes a few minutes would pass.
There seems to be a few fixes and a few causes, but if you look at the running processes and filter out mysql processes, you’ll see there are actually a few instances already running, when you should have only one.
local_admin@fog:~$ ps aux | grep mysql
mysql 1089 2.3 1.2 821128 49136 ? Ssl 16:11 0:00 /usr/sbin/mysqld
root 1486 0.0 0.0 4440 700 ? S 16:11 0:00 /bin/sh /usr/bin/mysqld_safe
mysql 1838 0.1 0.8 380768 33084 ? Sl 16:11 0:00 /usr/sbin/mysqld --basedir=/usr --datadir=/var/lib/mysql --plugin-dir=/usr/lib/mysql/plugin --user=mysql --log-error=/var/log/mysql/error.log --pid-file=/var/run/mysqld/mysqld.pid --socket=/var/run/mysqld/mysqld.sock --port=3306
There are a few fixes that have been suggested:
- You can issue this command, based on what Tom Elliott suggested here.
- echo manual | sudo tee /etc/init/mysql.override
- What worked for me, however, was to edit /opt/fog/.fogsettings and fill in the following blank lines to match the respective fields in /var/www/fog/lib/fog/Config.class.php:
- snmysqluser=”root”
snmysqlhost=”localhost” - Afterwards, run dpkg-reconfigure mysql-server-5.5 and use the same password specified in the fogsettings file to reset the mySQL database password.
- snmysqluser=”root”
There is a lot of similar issues documented on the FOG forums if you’re interested more in the issue. I think this should fix it but I would be interested if anyone else has another idea as to the cause of it.
FOG services don’t actually start
It seems – at least on Ubuntu 14.04 with FOG 1.2.0 – that the FOG task scheduler, multicast manager and image replication services just don’t start. Well, ok they do start, but then they stop quite quickly. Log files are generated but since the service abruptly stops, you get nothing more than a few lines. You can manually start the services yourself, and you’ll get some error about a process ID not existing, but you want to be able to do this automatically. Add this to /etc/rc.local to force restart of the FOG services 10 seconds after system startup.
sleep 10
service FOGMulticastManager restart
service FOGScheduler restart
service FOGImageReplicator restart
exit 0
Snapin file size limit
By default, snap-ins are limited to being really small. But if you want to use snapins to deploy large files, you will need to edit /etc/php5/apache2/php.ini to increase the limits. The amount of POST data you can send and the file size limit needs to be changed, so find the following lines and set them to the following values (you can go higher or lower, of course).
memory_limit = 2000M
post_max_size = 8000M
upload_max_filesize = 8000M
FOG on a virtual machine?
This really isn’t a hugely important point since this installation guide applies for physical machines too, but one of the things to consider in this post is that it was decided to move FOG to a VM. There is now High Availability – which, essentially, means that if the host running FOG fails then a second host takes over and FOG should keep running seamlessly. Additionally, we can now take advantage of our new storage provision and move some of the images onto this.
My configuration settings are very lean, get still quite generous, with only a single dual core virtual CPU and 4GB of memory. The hard disk space is similarly small at only 40GB thin provision; the reason for this will be apparent later. Finally, we can create snapshots in a VM and migrate it around and back it up elsewhere by downloading the entire set of virtual disk files.
I did some quick bandwidth test using iperf to see what sort of throughput could be achieved on the system and the result was suggesting speeds of 624Mb/s, which perhaps could be improved later but is nevertheless a reasonable way to 1Gb/s speeds (although I haven’t done many tests over other systems to determine latency around the site).
admin@fog:~$ iperf -s
------------------------------------------------------------
Server listening on TCP port 5001
TCP window size: 85.3 KByte (default)
------------------------------------------------------------
[ 4] local 10.1.63.202 port 5001 connected with 10.9.112.224 port 22251
[ ID] Interval Transfer Bandwidth
[ 4] 0.0-10.0 sec 745 MBytes 624 Mbits/sec
Hopefully this will be enough to get most people started; if anyone has any questions do feel free to ask or post over on the FOG forums (which have just recently been updated and will likely have broken a lot of my links in older posts!). However, soon I will likely be checking out the new FOG and the new client!
‹ Mapping Samba shares in Windows (and how to assign drives through a Group Policy) How to find the MAC address of a Windows PC on a remote subnet ›
Thank you so much for posting this. I experienced many of the problems you stated above and your solutions worked like a charm for me!
Hello, I installed Fog 1.2.0 for Ubuntu 14.04 and made all the settings that are needed to install the program. The problem is that when I finished installing the software through the console, came to the passage where he gives me a direction to manage my server, I’ll address but does not show me the page. I’ve tried everything but can not find solution. So, as a last resort I turn to you thinking that perhaps a development problem in updating 1.0.1 to 1.2.0 or maybe I have made a bad configuration. Thank You.
Excellent content, any chance to provide as pdf too?
Hey, this guide was very helpful to me.
One thing I keep failing in, even with other imaging solution:
When booting using a NIC in order to reach the PXE server I get the error: “PXE-E55: proxyDHCP did not reply to request on port 4011”.
the only solution to this, according to MS and other posts is to remove DHCP option 60,66 and 67.
well, in both situations (with the above dhcp options and without) I get the same error.
Am I missing something??
** I configured FOG typically, dedicated VM, DHCP is on different server, same scope/subnet.
For some reason when I try to download fog my ubuntu server times out. Help
if timeout try: wget http://downloads.sourceforge.net/project/freeghost/FOG/fog_1.2.0/fog_1.2.0.tar.gz
That is some nice work you have done here.
I have almost mimicked your install to the letter but having overcome DNS/DHCP issues successfully and initially was able to upload an image .. it all then failed when I tried to upload a second image.
Thinking this was maybe wrong using the system disk , I installed a second hdd and formatted/partitioned as you have described. /dev/sdb
guess what, the script that runs when you issue an upload task just hangs when it tries to mount to the /images on /dev/sda !! Why is the upload script coded to go to that point?
Any ideas?
Honestly everything else checks out…how do I point that to go to /sdb?
cheers
Steve
I am having the exact same issue. I add another HDD to increase the storage capacity. The PXE boot when it is looking for Hard Disk: /dev/sda – it hangs… I need to have it point to /dev/sdb… Is there another config file we need to edit?